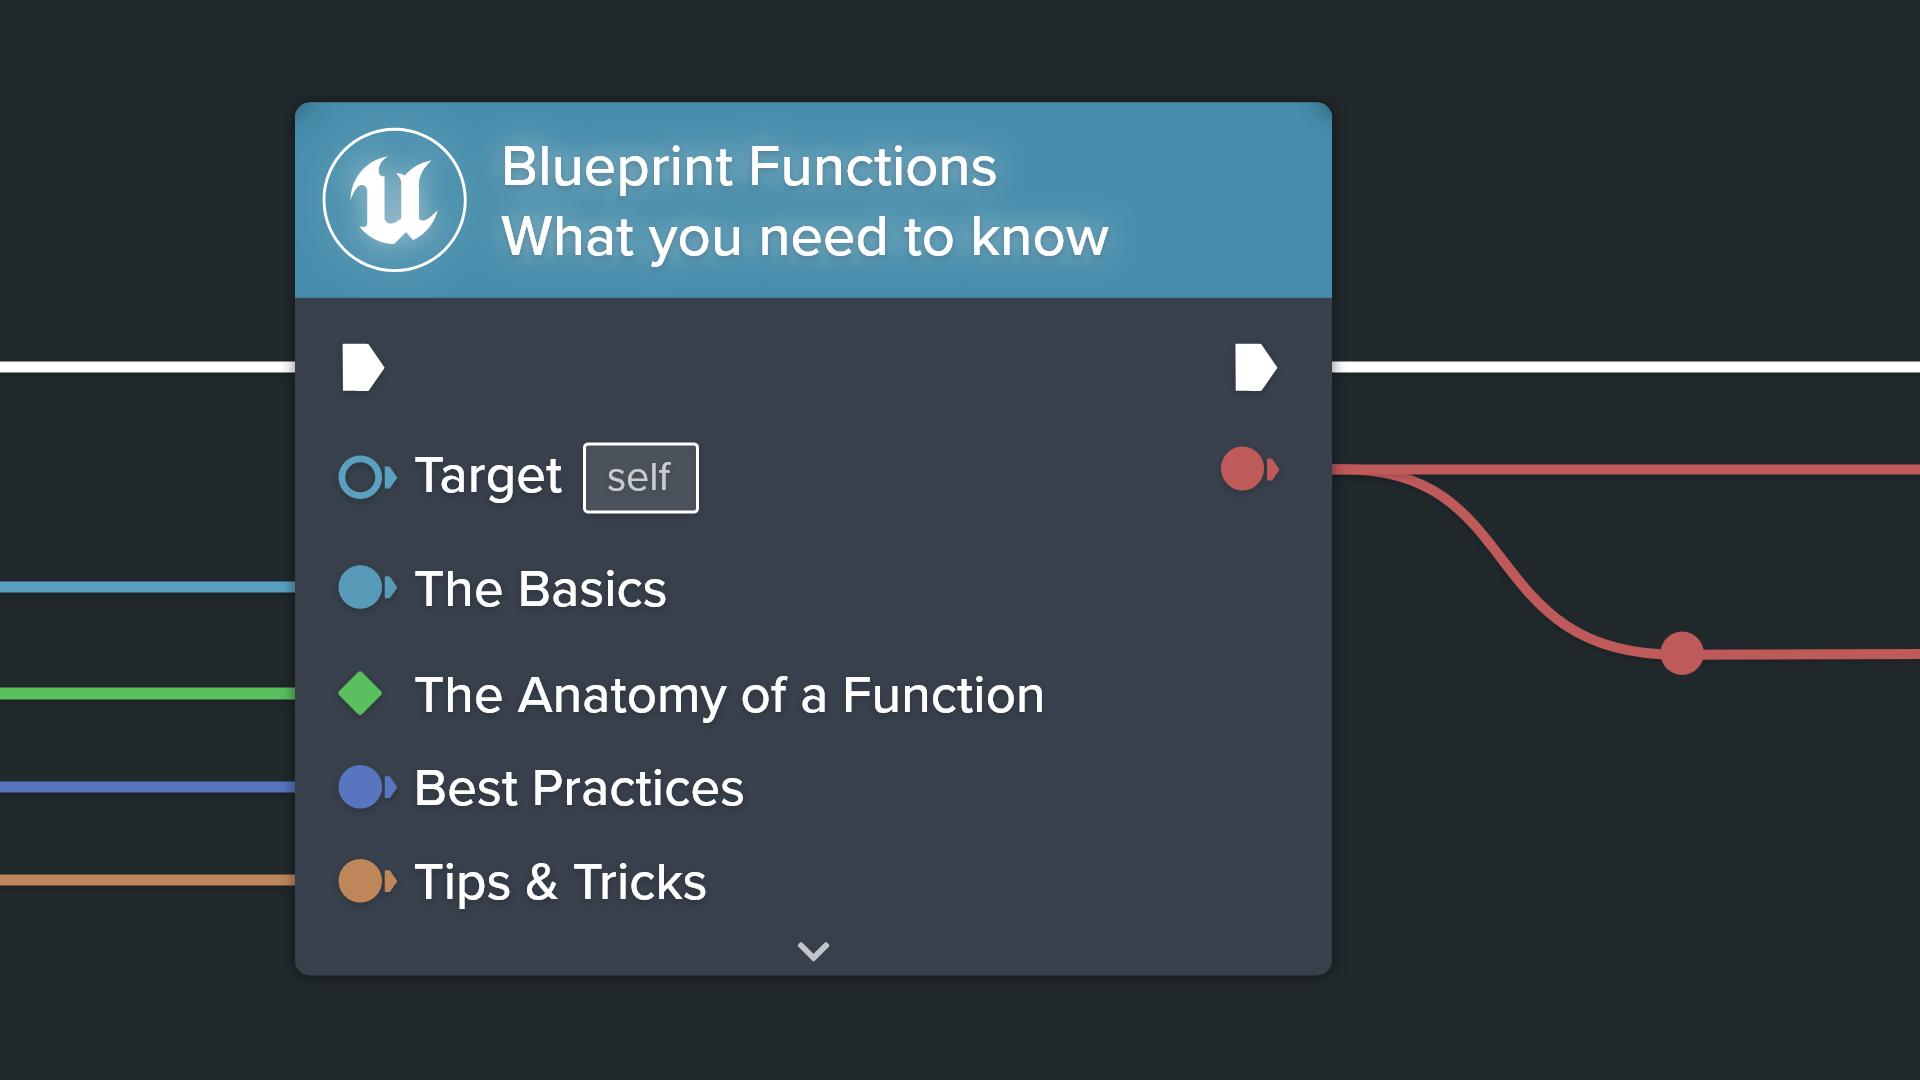
Blueprint Functions: What you need to know
Tezenari5 min read|
Blueprints
Variables
Each guide takes 40+ hours to research, test, and write. If it saved you time, your support keeps this free for everyone.

Enhanced Input: What you need to know
From the basics to best practices, this is what you need to know about Enhanced Input
Blueprint Variables: What you need to know
From the basics to best practices, this is what you need to know about Blueprint Variables

Data Validations: What you need to know
Learn how to validate and audit assets with custom-scripted rulesets
Custom Primitive Data
Learn how you can use Custom Primitive Data to easily modify Scalar and Vector material parameters without needing Dynamic Material Instances.
The Visual Logger
Utilize the Visual Logger to capture, visualize, and debug in-game events.
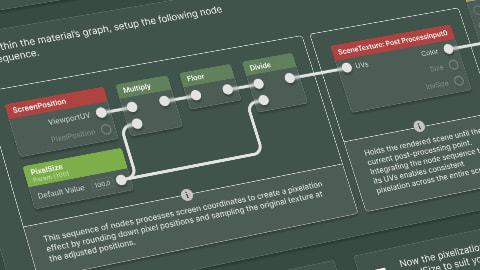
Post Process Pixelization
Learn how to quickly create a Pixel Shader effect for your Unreal Engine project.
Functions are essential when it comes to both Unreal Engine development and programming in general. They allow the reuse of code, improve overall maintainability and allow scalability by being callable from other entities -- such as blueprints.
In this article, I will be teaching you everything you need to know about Unreal Engine Blueprint functions.
Understanding the basics of what functions are goes a long way in being better prepared to create and utilize functions properly and efficiently. Without this fundamental knowledge, it's very easy to miss out on opportunities to simplify Unreal Engine development.
A function is an isolated block of code that is executed when called. This block of code can take parameters as an input, process those parameters, and return a result.
As an important note -- you can have as many, or as few, inputs and return parameters as needed. That said, they are not required.
There are many reasons why a function should be used --
Organization
Functions are a great way to compartmentalize code into smaller chunks of logic that are easier to handle. These smaller chunks can reduce the overall complexity of the blueprint.
Re-usability
Once a function has been established, it can be reused as many times as needed. This heavily cuts down on the need to copy and paste the same exact code in multiple locations.
Be forward-thinking and lazy. Write once – reuse.
Extensibility
Adjustments to functions will automatically propagate everywhere the function is used. Copy and pasted code do not.
Functions can be created in any type of blueprint and in Blueprint Function Libraries.
To create a function inside of a blueprint, you can utilize the following methods --
This is the primary and most common method to create functions for blueprints.

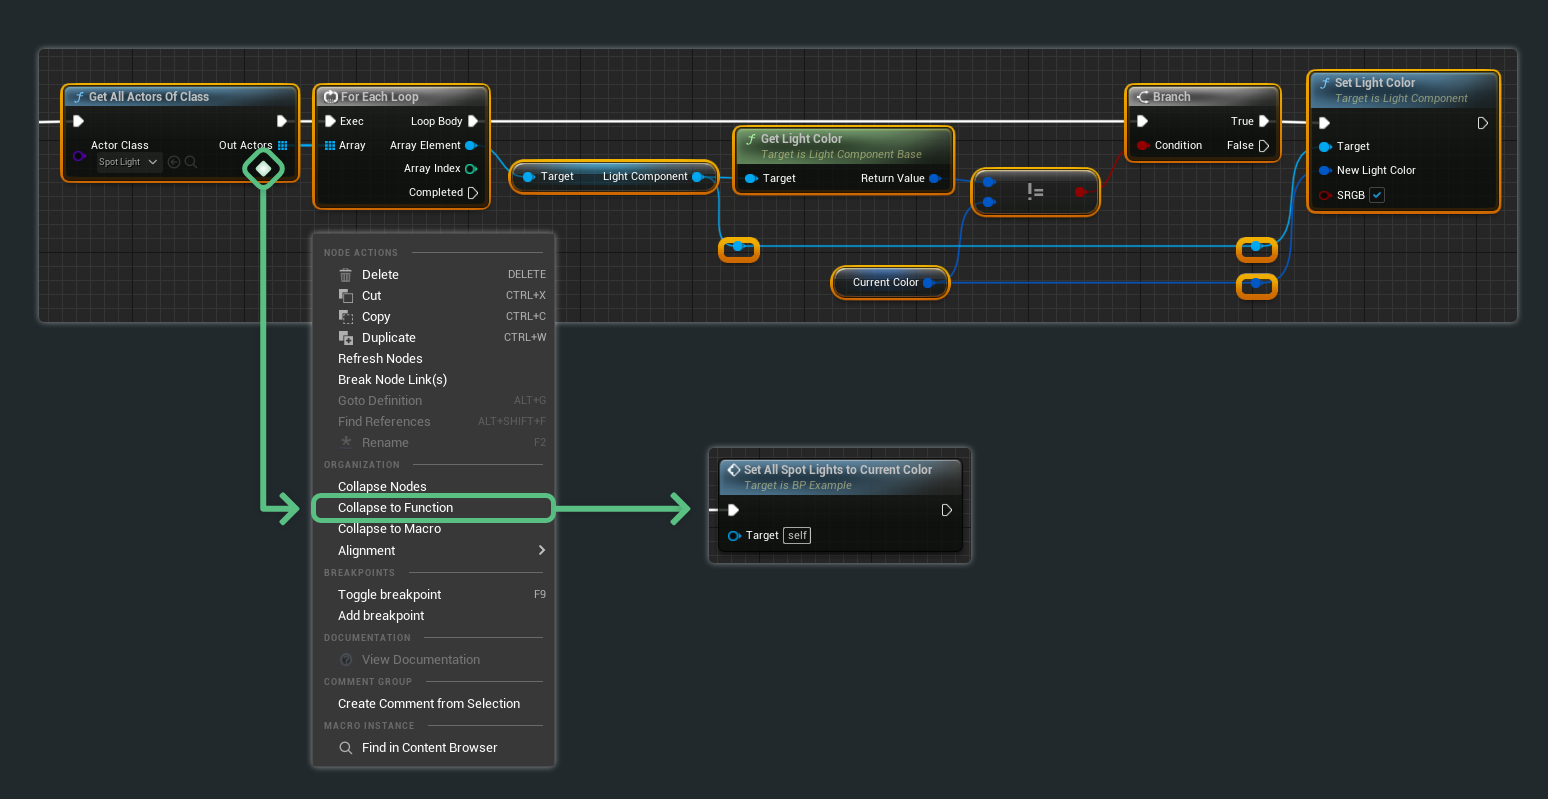
You can convert a selection of nodes into a blueprint.
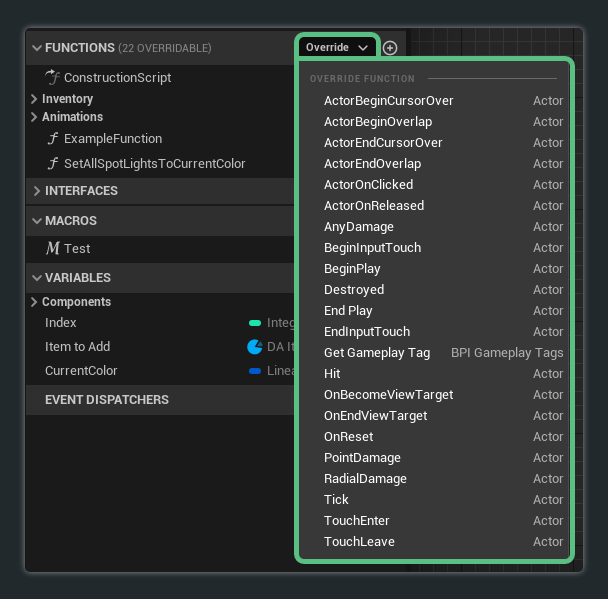
Functions that have been established in the blueprints parent class can be overridden.
Events can be converted to functions and vice-versa.

Functions can be called via a multitude of methods --
For Impure Functions -- make sure to hook up the function's execution input pin otherwise the function will not execute.
Drag and drop from Functions section
Under the My Blueprint Functions section, simply hold left-click on any of the functions available and drag into the graph.
From within a blueprint, simply right-click to open the Action Menu. Utilize its search field to find the desired function.

By holding left-click on a node property and dragging it anywhere in the graph, the Action Menu will open. The options available will be based on the context of the property.
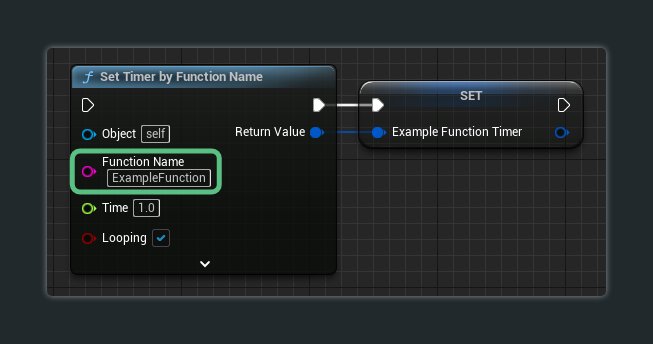
Functions can be called by the Set Timer by Event nodes. Each time the timer reaches the end of the given time, the function will be executed.

While the Set Timer by Function Name node is available, I do not recommend using it over the Set Timer by Event as string identifiers do not update if you ever change the functions name.
In this section, I will be going over every aspect of the function in detail.
The details panel for a function is where the function's properties are set. This is often one of the first areas of configuration when creating a function.

This panel hosts multiple different elements --
This is where the name of the function will be declared.
It's critically important that the name of the function clearly states the functions intent -- thus having a verb as a prefix.
Examples
Here are some good and bad examples to provide a better understanding on how to properly name functions --
| Good Example ✔ | Bad Example ✘ |
|---|---|
| IsVisible | Visible |
| GetStamina | Stamina |
| SetMaxHealth | MaxHealth |
| GetInventory | Inventory |
| ReceiveMessage | GotMessage |
| Attack | Atk |
| GetColor | Color |
| GetCachedVehicleManager | Function_0 |
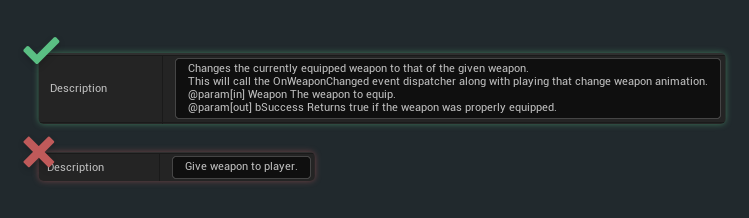
The description will explain what the function does.
It's critically important that this field gets filled out and that it clearly states what the function does along with detailing each input and output variable.
Adding a description to a variable can be done via -- by going to the next line (SHIFT + ENTER) and by typing in the following -- @param VariableName The description of the variable
Where will the description of the function be viewable from?
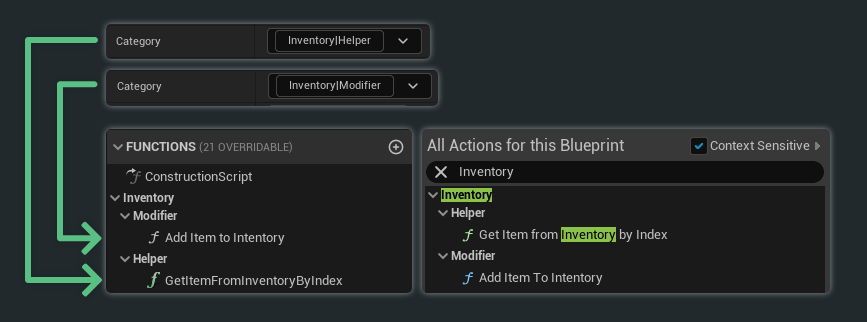
When set, this will change where the function will be located in both the Actions Menu and in the Functions category in the blueprints My Blueprint Panel.
It's ideal to set a category rather than leave it to the default as it will allow developers to more easily find the function.
Nested categories can be accomplished by placing a vertical bar ( | ) in between the two category names.

Setting keywords help to quickly find a function when searching for it with the Action Menu.
Each entry should be separated by a comma.
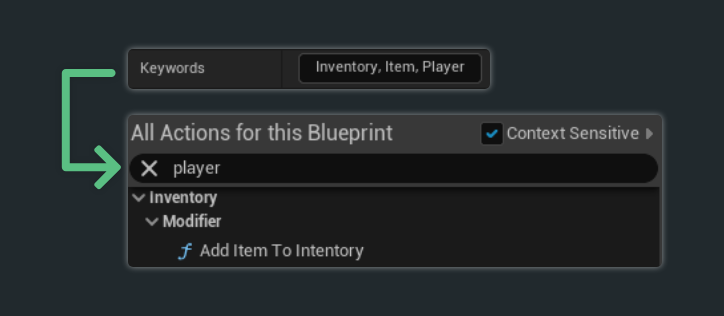
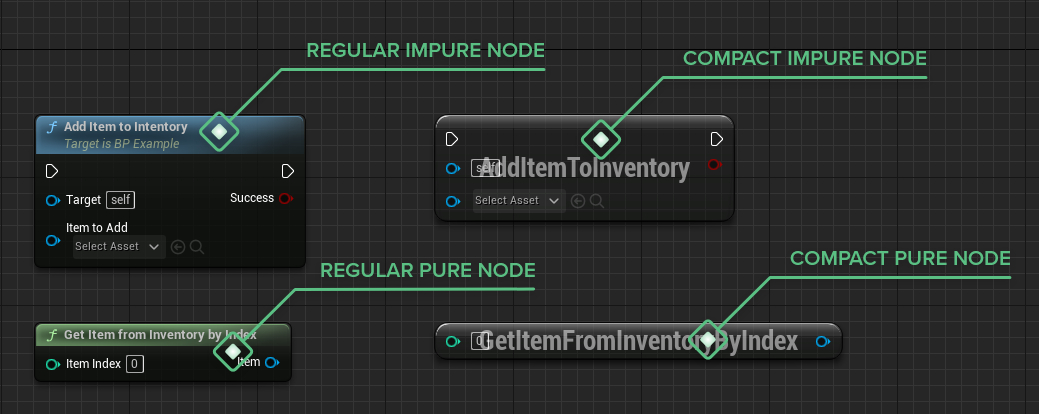
The function node will change to a compact form when text is added to this field.
Access specifiers define what can access the function.
By default, this setting is set to public, allowing for any object to access it.
The access specifier option can be found in the Details Panel when the function is selected in the My Blueprint Panel.
Public
The public access specifier allows the function to be called from any other object. This is the default specifier.
Use this specifier if you want the function to be freely accessible.
Protected
The protected access specifier locks the function to only be accessible from within the declared blueprint or any child blueprints.
Use this specifier if you want the function to only be usable from within the declared blueprint and any derived children blueprints.
Private
The private access specifier locks the function to be only accessible from within the declared blueprint.
Use this specifier if you only want the function to be usable from within the declared blueprint and NOT by anything else.
When enabled, the function will become a pure function. Pure functions cannot alter data and the execution pins are removed.
Pure functions should never modify data, or call any function that can modify data. They are purely for getting or calculating data.
Pure Vs. Impure
Pure Functions are --
Impure Functions are --

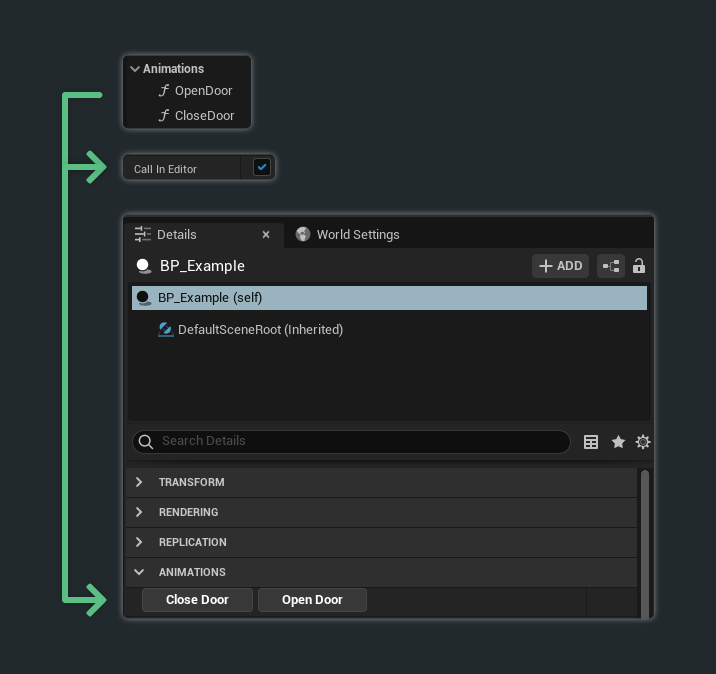
When enabled, a button with the functions name will be added to the blueprint's details panel. When this button is pressed, the function is called.
Notes
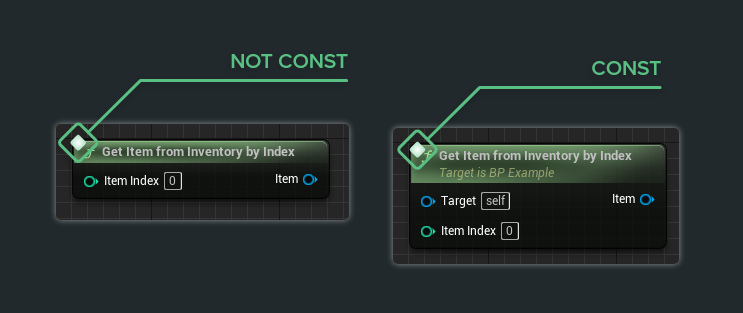
When enabled, the function cannot modify any member variables of the blueprint.
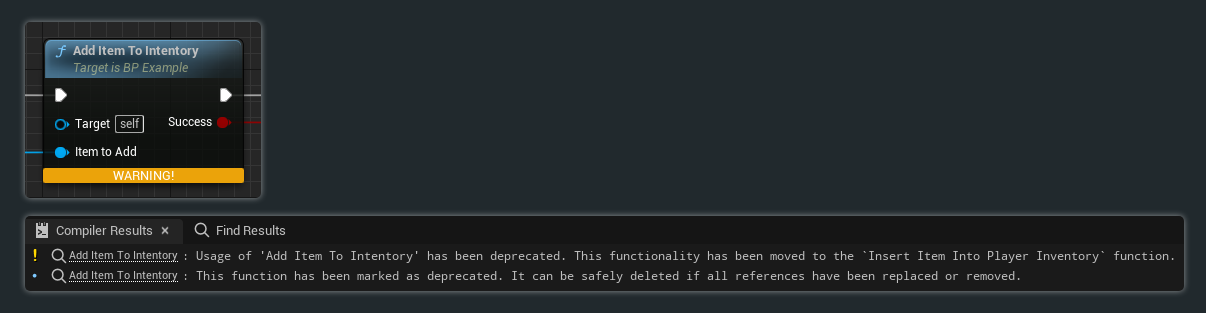
Marks the function as obsolete and produces a compiler warning indicating that the function should be either removed or replaced.
Make sure to fill out the deprecation message.
Deprecation Message
The message that will be included with the compiler warning.
It is ideal to state what function is replacing the deprecated function. This helps other developers, and future you.
X is no longer being used. Please replace with Y.
The parameters to bring into the function.
Default Value
The default value to use for that variable when the pin isn't used or hasn't been changed.
Note that this option is only available for select variables.
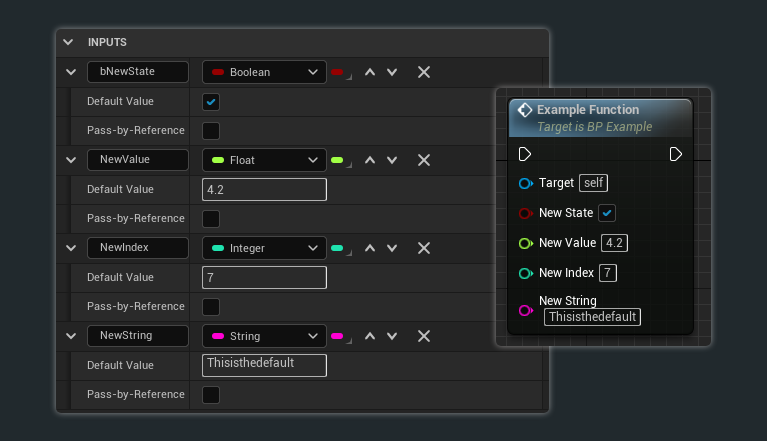
To reset a value back to its default, right-click on the variable on the function node and click on Reset to Default Value
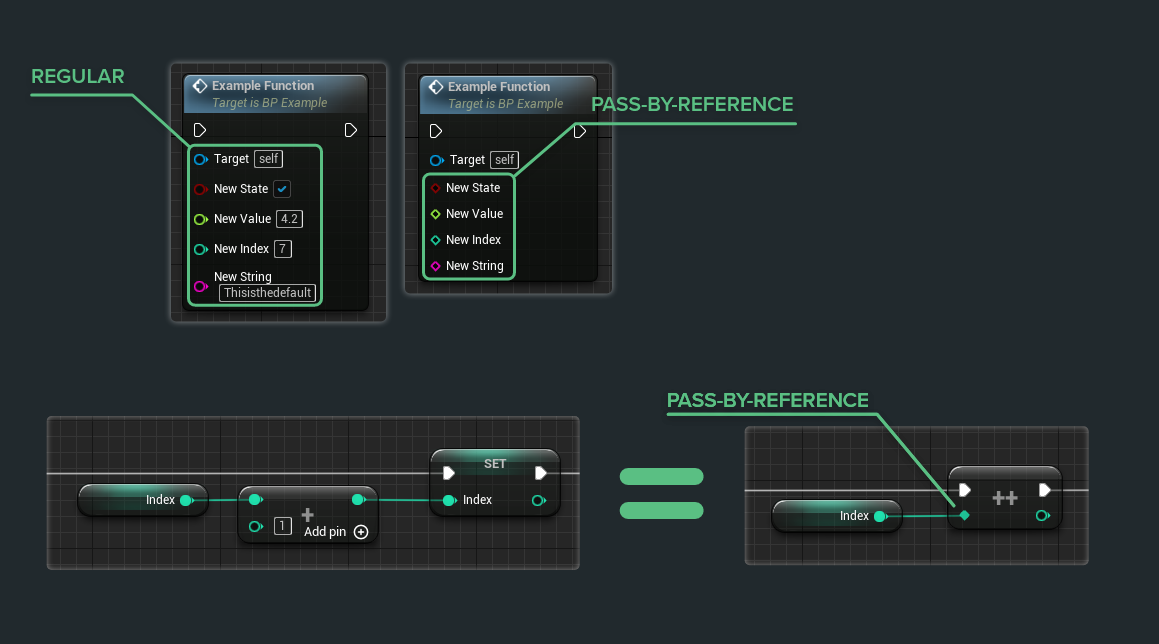
Pass-by-Reference
Pass the variable itself rather than a copy, allowing for any modifications to it to reflect back on the origin variable.
Pass-by-Reference variables are easily identified by their diamond-shaped data pins.
The resulting parameters.
This is where the functionality of the function is set up.
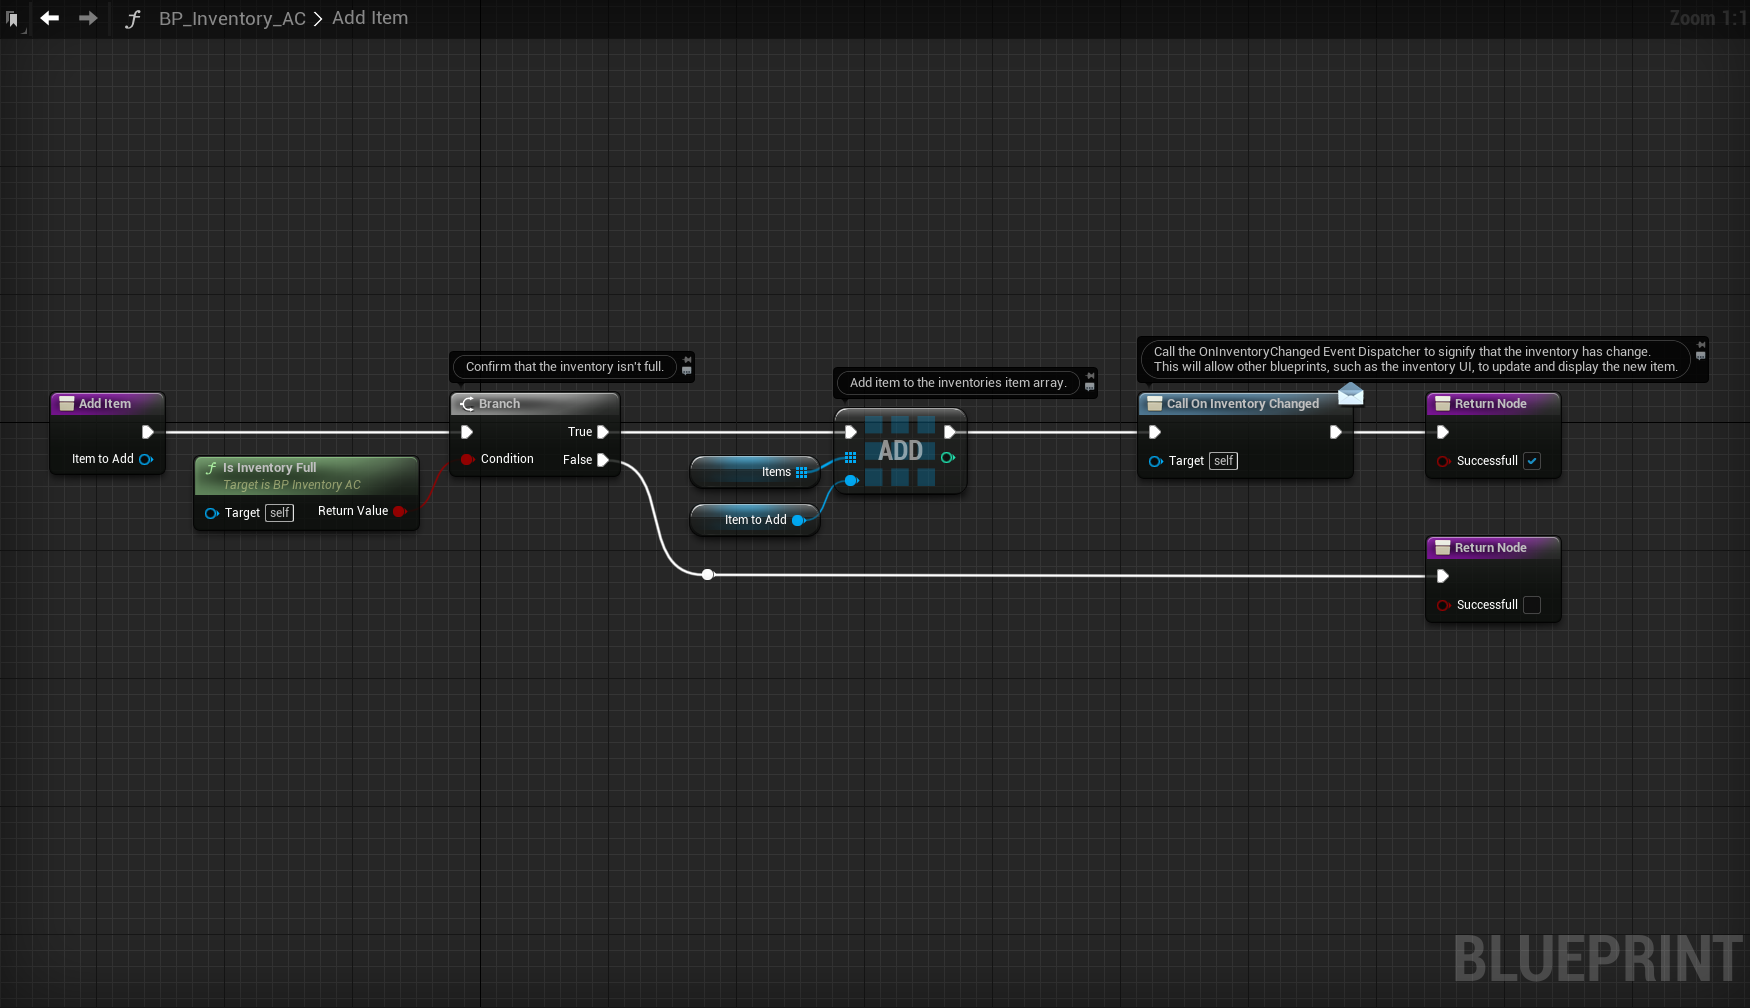
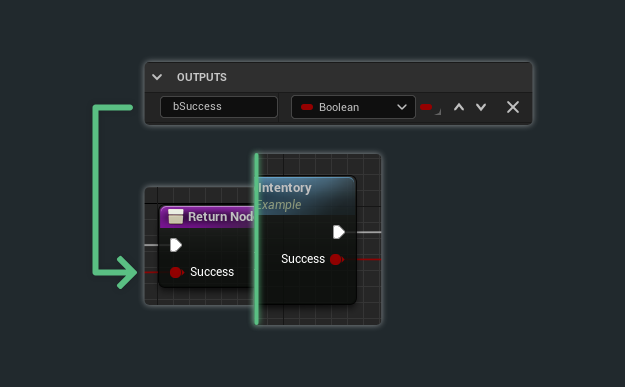
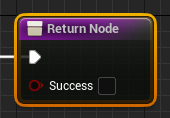
The Return Node marks the end of the function. This will be where the output variables will be passed into.
Important Notes
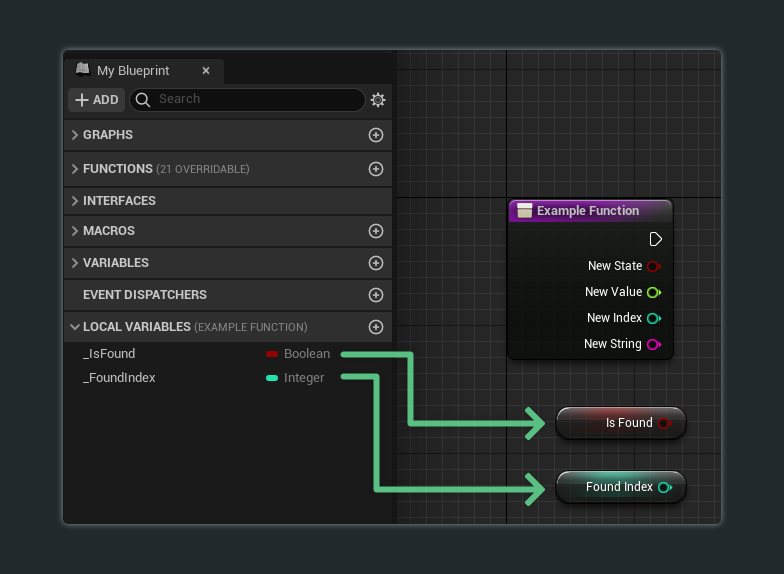
These are essentially variables that are only relevant during the function's execution. Once the function has finished executing, the variable is thrown away.
Local variables are only found from within the graph of the function.
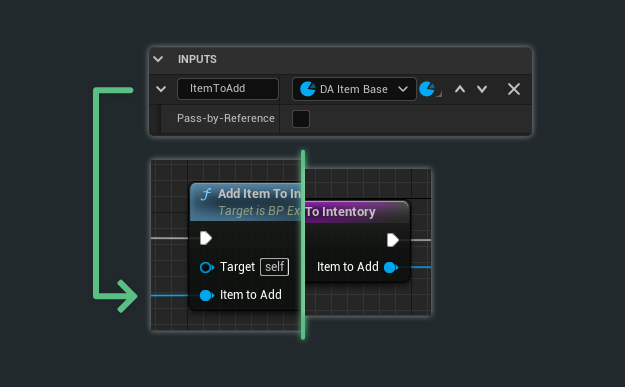
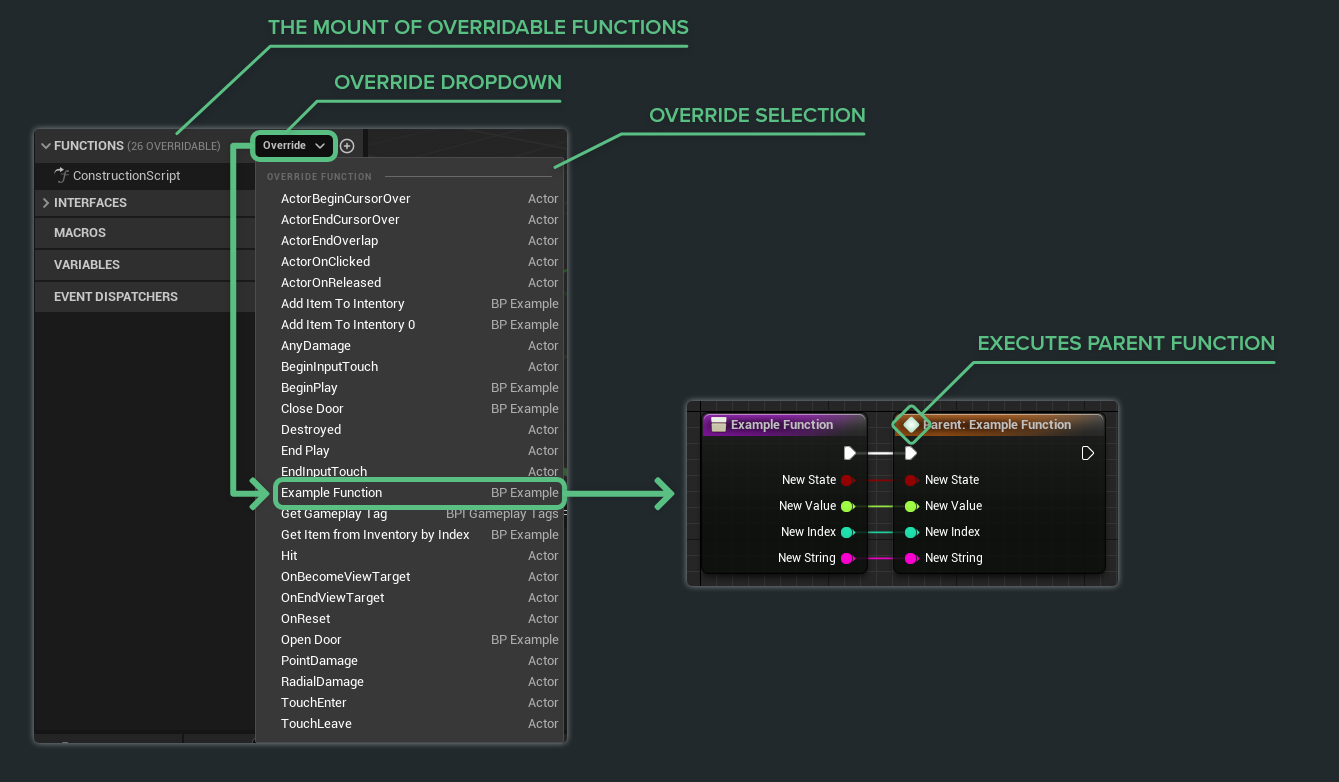
Functions declared in parent blueprints that have their access specifiers set to either Public or Protected can be overridden.
Overriding functions are a great way to either expand upon the parent's function itself or to completely override it.
Parent Node
When a function is overridden, a Parent Node will be present. This Parent Node is what executes the parent functions logic.
If the desire is to fully override the function without the parent function executing, simply remove the Parent Node.
It's ideal to create getter and setter functions for variables that need to be accessed outside of the blueprint. This allows for a greater degree of flexibility and simplifies the debugging process when things go wrong.
Function names, inputs, outputs, and local variables should clearly express their intent.
For example, setter functions should start with Set and getter functions should start with Get. Or if the getter function is asking for a boolean state, it should start with Is.
| Good Example ✔ | Bad Example ✘ |
|---|---|
| IsVisible | Visible |
| GetStamina | Stamina |
| SetMaxHealth | MaxHealth |
| GetInventory | Inventory |
| ReceiveMessage | GotMessage |
| Attack | Atk |
| GetColor | Color |
| GetCachedVehicleManager | Function_0 |
While this goes for everything -- always add a description to the functions you create and manage. These are immensely helpful when you're utilizing them and debugging them many weeks down the line.
Make sure the description clearly explains what the function does.
Input/output descriptions
When filling out the description of the function, make sure to add descriptions for the input and output variables.
This can be done by going to the next line (SHIFT + ENTER) and by typing in the following -- @param VariableName The description of the variable
Check out the full tip for more information.

It's ideal to organize functions by categories. This cleans up the function hierarchy along with helping you and anyone else easily find the function.
Do not create functions that are only ever used once inside of the owning blueprint. More prudent here would be to use a collapsed node instead.
Do not convert a selection of nodes into a function and not clean it up. Most of the time, there are going to be extra input/output variables that need to be culled, and nodes that need to be re-arranged post-conversion.
Do not leave spaghetti code -- clean up those functions. Functions should be easily navigatable when you come back to them in a year's time.
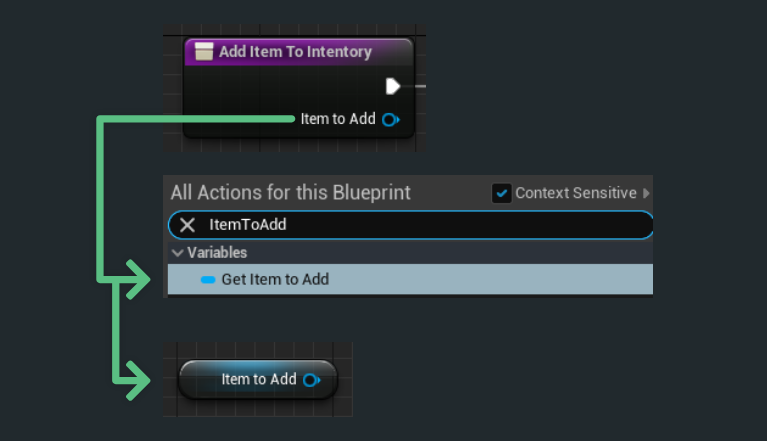
While inside of the function graph, input variables can be accessed directly as variable nodes.
Utilize these to remove those long wires and clean up your function graphs.
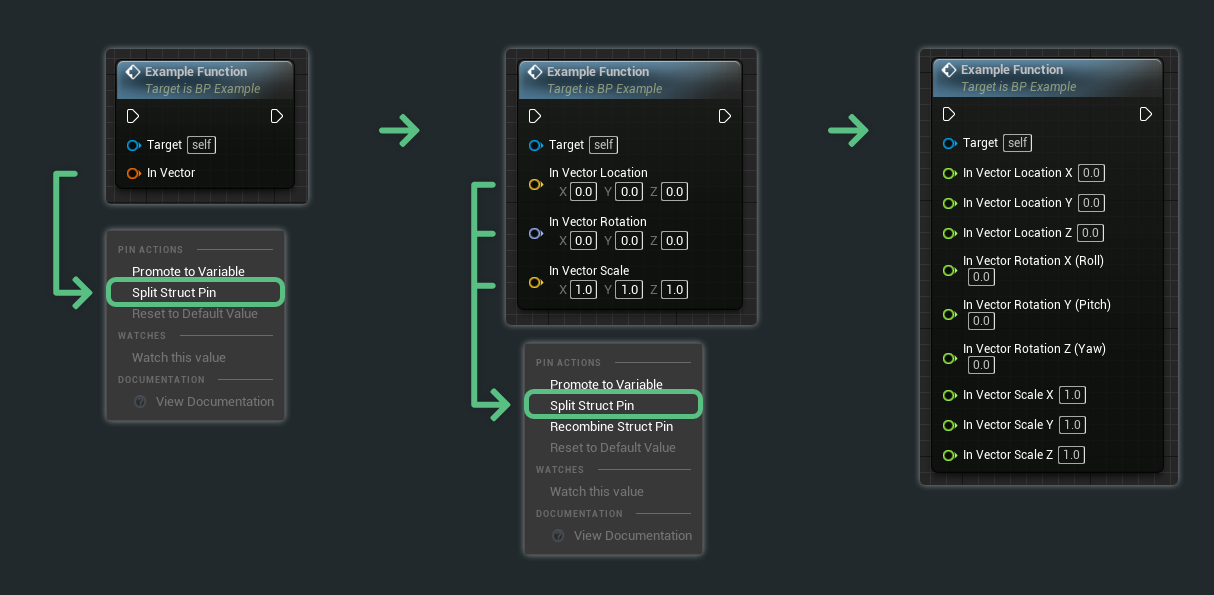
Parameters that have multiple internal values -- such as a vector or structure -- can be split in place. Simply right-click on the property and click Split Struct Pin.
Parameters can be re-combined by right-clicking on one of the split parameters and clicking on Recombine Struct Pin.
These are some of the questions I get frequently asked.
While they share similar characteristics, there are stark differences between a function, a macro, and a custom event.
Here are the primary differences --
| Feature | Function | Macro | Custom Event |
|---|---|---|---|
| Input Parameters | Yes | Yes | Yes |
| Output Parameters | Yes | Yes | No |
| Execution Paths | One | Many | One |
| Callable by other blueprints | Yes | No | Yes |
| Latent Nodes (I.E: Delay) | No | Yes | Yes |
| Replicatable | No | No | Yes |
| Forcibly End Execution | Yes (Return Node) | No | No |
Check out the following resources to learn more about the subject.